
Understanding the difference between blocking (=) and non-blocking (<=) assignments is critical for writing correct Verilog code. The wrong choice can lead to simulation mismatches, race conditions, and synthesized hardware that behaves differently than your testbench.
8 min read | Beginner to Intermediate
What You'll Learn
- Master the execution semantics of blocking (
=) versus non-blocking (<=) assignments - Understand time-step evaluation and how assignments are scheduled in Verilog simulators
- Apply the correct assignment type for combinational logic, sequential logic, and testbenches
- Recognize and avoid race conditions caused by improper mixing of assignment types
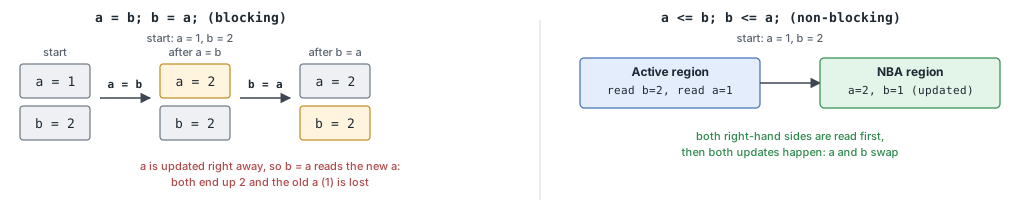
Assignment Types Comparison
| Aspect | Blocking (=) | Non-Blocking (<=) |
|---|---|---|
| Execution Order | Sequential - blocks until complete | Concurrent - schedules for end of time-step |
| When RHS Evaluated | Immediately before assignment | At statement execution, assigned later |
| When LHS Updated | Immediately | At end of current time-step |
| Primary Use Case | Combinational logic, testbenches | Sequential (clocked) logic |
| Synthesis Result | Combinational logic (no registers) | Registers (flip-flops) |
| Race Condition Risk | High if mixed with non-blocking | Low - deterministic scheduling |
Blocking Assignments
Blocking assignment statements are assigned using = and are executed one after the other in a procedural block. Each statement must complete before the next one executes. However, this will not prevent execution of statements that run in a parallel block.
module tb;
  reg [7:0] a, b, c, d, e;

  initial begin
    a = 8'hDA;                                            // Execute first
    $display ("[%0t] a=0x%0h b=0x%0h c=0x%0h", $time, a, b, c);  // Then display (b, c still unassigned)
    b = 8'hF1;                                            // Then assign b
    $display ("[%0t] a=0x%0h b=0x%0h c=0x%0h", $time, a, b, c);  // Display again (c still unassigned)
    c = 8'h30;                                            // Finally assign c
    $display ("[%0t] a=0x%0h b=0x%0h c=0x%0h", $time, a, b, c);  // Display all assigned values
  end

  initial begin                                          // This block runs in parallel with the first block
    d = 8'hAA;                                           // Execute first in this block
    $display ("[%0t] d=0x%0h e=0x%0h", $time, d, e);     // Display (e still unassigned)
    e = 8'h55;                                           // Then assign e
    $display ("[%0t] d=0x%0h e=0x%0h", $time, d, e);     // Display both assigned
  end
endmodule
Note that there are two initial blocks which are executed in parallel when simulation starts. Statements are executed sequentially in each block and both blocks finish at time 0ns. To be more specific, variable a gets assigned first, followed by the display statement which is then followed by all other statements. This is visible in the output where variables b and c are 8'hxx in the first display statement because their assignments have not been executed yet when the first $display is called.
ncsim> run
[0] a=0xda b=0xx c=0xx
[0] a=0xda b=0xf1 c=0xx
[0] a=0xda b=0xf1 c=0x30
[0] d=0xaa e=0xx
[0] d=0xaa e=0x55
ncsim: *W,RNQUIE: Simulation is complete.
Real-World Application: Verification Testbenches
In verification testbenches, blocking assignments are preferred for stimulus generation because they create predictable, sequential behavior. When applying test vectors to a DUT (Device Under Test), you want each operation to complete before the next begins. This makes the test flow easy to read, debug, and maintain. Non-blocking assignments in testbenches can create subtle timing issues where stimulus appears to work in simulation but doesn't match the intended test sequence.
Blocking Assignments with Delays
In the next example, we'll add a few delays into the same set of statements to see how it behaves.
module tb;
  reg [7:0] a, b, c, d, e;

  initial begin
    a = 8'hDA;                                            // Execute at time 0
    $display ("[%0t] a=0x%0h b=0x%0h c=0x%0h", $time, a, b, c);
    #10 b = 8'hF1;                                        // Wait 10ns, then execute
    $display ("[%0t] a=0x%0h b=0x%0h c=0x%0h", $time, a, b, c);  // Execute at time 10
    c = 8'h30;                                            // Execute immediately after b
    $display ("[%0t] a=0x%0h b=0x%0h c=0x%0h", $time, a, b, c);  // Still at time 10
  end

  initial begin
    #5 d = 8'hAA;                                         // Wait 5ns, then execute
    $display ("[%0t] d=0x%0h e=0x%0h", $time, d, e);      // Execute at time 5
    #5 e = 8'h55;                                         // Wait another 5ns (total 10ns)
    $display ("[%0t] d=0x%0h e=0x%0h", $time, d, e);      // Execute at time 10
  end
endmodule
ncsim> run
[0] a=0xda b=0xx c=0xx
[5] d=0xaa e=0xx
[10] a=0xda b=0xf1 c=0xx
[10] a=0xda b=0xf1 c=0x30
[10] d=0xaa e=0x55
ncsim: *W,RNQUIE: Simulation is complete.
Blocking Assignments in Testbenches: Use blocking assignments in testbenches when you want sequential stimulus generation. Each assignment completes before the next begins, making the test flow predictable and easy to debug.
Non-Blocking Assignments
Non-blocking assignment allows assignments to be scheduled without blocking the execution of following statements and is specified by a <= symbol. It's interesting to note that the same symbol is used as a relational operator in expressions (less than or equal), and as an assignment operator in the context of a non-blocking assignment.
If we take the first example from above and replace all = symbols with a non-blocking assignment operator <=, we'll see a significant difference in the output.
module tb;
  reg [7:0] a, b, c, d, e;

  initial begin
    a <= 8'hDA;                                           // Schedule assignment to 'a' for end of time-step
    $display ("[%0t] a=0x%0h b=0x%0h c=0x%0h", $time, a, b, c);  // 'a' not updated yet!
    b <= 8'hF1;                                           // Schedule assignment to 'b' for end of time-step
    $display ("[%0t] a=0x%0h b=0x%0h c=0x%0h", $time, a, b, c);  // 'a', 'b' not updated yet!
    c <= 8'h30;                                           // Schedule assignment to 'c' for end of time-step
    $display ("[%0t] a=0x%0h b=0x%0h c=0x%0h", $time, a, b, c);  // None updated yet!
  end                                                     // End of time-step: Now a, b, c get their values

  initial begin
    d <= 8'hAA;                                           // Schedule assignment to 'd'
    $display ("[%0t] d=0x%0h e=0x%0h", $time, d, e);      // 'd' not updated yet!
    e <= 8'h55;                                           // Schedule assignment to 'e'
    $display ("[%0t] d=0x%0h e=0x%0h", $time, d, e);      // 'd', 'e' not updated yet!
  end                                                     // End of time-step: Now d, e get their values
endmodule
Notice that all the $display statements printed 'hx. The reason for this behavior lies in the way non-blocking assignments are executed:
- The RHS of every non-blocking statement at a particular time-step is evaluated and captured
- Execution immediately moves to the next statement
- The captured RHS value is assigned to the LHS variable only at the end of the time-step
ncsim> run
[0] a=0xx b=0xx c=0xx
[0] a=0xx b=0xx c=0xx
[0] a=0xx b=0xx c=0xx
[0] d=0xx e=0xx
[0] d=0xx e=0xx
ncsim: *W,RNQUIE: Simulation is complete.
So, if we break down the execution flow of the above example we'll get something like what's shown below:
|__ Spawn Block1: initial
|   |___ Time #0ns : a <= 8'hDA, is non-blocking so note value of RHS (8'hDA) and execute next step
|   |___ Time #0ns : $display() is blocking, so execute this statement: But a hasn't received new values so a=8'hx
|   |___ Time #0ns : b <= 8'hF1, is non-blocking so note value of RHS (8'hF1) and execute next step
|   |___ Time #0ns : $display() is blocking, so execute this statement. But b hasn't received new values so b=8'hx
|   |___ Time #0ns : c <= 8'h30, is non-blocking so note value of RHS (8'h30) and execute next step
|   |___ Time #0ns : $display() is blocking, so execute this statement. But c hasn't received new values so c=8'hx
|   |___ End of time-step and initial block, assign captured values into variables a, b, c
|
|__ Spawn Block2: initial
|   |___ Time #0ns : d <= 8'hAA, is non-blocking so note value of RHS (8'hAA) and execute next step
|   |___ Time #0ns : $display() is blocking, so execute this statement: But d hasn't received new values so d=8'hx
|   |___ Time #0ns : e <= 8'h55, is non-blocking so note value of RHS (8'h55) and execute next step
|   |___ Time #0ns : $display() is blocking, so execute this statement. But e hasn't received new values so e=8'hx
|   |___ End of time-step and initial block, assign captured values into variables d and e
|
|__ End of simulation at #0ns
Real-World Application: Pipeline Design
In CPU and GPU pipeline designs, non-blocking assignments are essential for correctly modeling multi-stage pipelines. Each pipeline stage is a register that samples the previous stage's output on the clock edge. Using blocking assignments would create a combinational path where all stages would update simultaneously, destroying the pipeline behavior. Non-blocking assignments ensure each stage captures the previous value before any updates occur, maintaining pipeline integrity.
Non-Blocking Assignments with Delays
Next, let's use the second example and replace all blocking statements with non-blocking assignments.
module tb;
  reg [7:0] a, b, c, d, e;

  initial begin
    a <= 8'hDA;                                           // Schedule for end of time-step 0
    $display ("[%0t] a=0x%0h b=0x%0h c=0x%0h", $time, a, b, c);  // 'a' not yet updated
    #10 b <= 8'hF1;                                       // Wait 10ns, then schedule for end of time-step 10
    $display ("[%0t] a=0x%0h b=0x%0h c=0x%0h", $time, a, b, c);  // 'b' not yet updated (but 'a' is now 0xDA)
    c <= 8'h30;                                           // Schedule for end of time-step 10
    $display ("[%0t] a=0x%0h b=0x%0h c=0x%0h", $time, a, b, c);  // 'b', 'c' not yet updated
  end

  initial begin
    #5 d <= 8'hAA;                                        // Wait 5ns, then schedule for end of time-step 5
    $display ("[%0t] d=0x%0h e=0x%0h", $time, d, e);      // 'd' not yet updated
    #5 e <= 8'h55;                                        // Wait 5ns more (total 10ns), schedule for end of time-step 10
    $display ("[%0t] d=0x%0h e=0x%0h", $time, d, e);      // 'e' not yet updated (but 'd' is now 0xAA)
  end
endmodule
Once again we can see that the output is different than what we got before with blocking assignments.
ncsim> run
[0] a=0xx b=0xx c=0xx
[5] d=0xx e=0xx
[10] a=0xda b=0xx c=0xx
[10] a=0xda b=0xx c=0xx
[10] d=0xaa e=0xx
ncsim: *W,RNQUIE: Simulation is complete.
If we break down the execution flow we'll get something like what's shown below:
|__ Spawn Block1 at #0ns: initial
|   |___ Time #0ns : a <= 8'hDA, is non-blocking so note value of RHS (8'hDA) and execute next step
|   |___ Time #0ns : $display() is blocking, so execute this statement: But a hasn't received new values so a=8'hx
|   |___ End of time-step : Assign captured value to variable a, and a is now 8'hDA
|   |___ Wait until time advances by 10 time-units to #10ns
|
|   |___ Time #10ns : b <= 8'hF1, is non-blocking so note value of RHS (8'hF1) and execute next step
|   |___ Time #10ns : $display() is blocking, so execute this statement. But b hasn't received new values so b=8'hx
|   |___ Time #10ns : c <= 8'h30, is non-blocking so note value of RHS (8'h30) and execute next step
|   |___ Time #10ns : $display() is blocking, so execute this statement. But c hasn't received new values so c=8'hx
|   |___ End of time-step and initial block, assign captured values into variables b, c
|
|__ Spawn Block2 at #0ns: initial
|   |___ Wait until time advances by 5 time-units to #5ns
|
|   |___ Time #5ns : d <= 8'hAA, is non-blocking so note value of RHS (8'hAA) and execute next step
|   |___ Time #5ns : $display() is blocking, so execute this statement: But d hasn't received new values so d=8'hx
|   |___ End of time-step : Assign captured value to variable d, and d is now 8'hAA
|   |___ Wait until time advances by 5 time-units to #10ns
|
|   |___ Time #10ns : e <= 8'h55, is non-blocking so note value of RHS (8'h55) and execute next step
|   |___ Time #10ns : $display() is blocking, so execute this statement. But e hasn't received new values so e=8'hx
|   |___ End of time-step and initial block, assign captured values to variable e, and e is now 8'h55
|
|__ End of simulation at #10ns
Critical Timing Difference: Non-blocking assignments with delays create time-step boundaries. The assignment is scheduled for the end of the time-step at which it executes, not immediately. This is why 'b' and 'c' don't get their values until after the #10ns delay completes.
When to Use Each Type
Choosing the correct assignment type is critical for both simulation accuracy and synthesis results:
Use Blocking Assignments (=) For:
- Combinational Logic: In
always @(*)oralways @(sensitivity_list)blocks modeling combinational circuits - Testbench Stimulus: Sequential test generation in
initialblocks - Temporary Variables: Intermediate calculations within a single procedural block
// Combinational logic - use blocking
always @(*) begin
  temp = a & b;                    // Blocking: intermediate value
  c = temp | d;                    // Blocking: final output depends on temp
end
Use Non-Blocking Assignments (<=) For:
- Sequential (Clocked) Logic: In
always @(posedge clk)blocks modeling flip-flops and registers - State Machines: State register updates and registered outputs
- Pipeline Stages: Data propagation through pipeline registers
// Sequential logic - use non-blocking
always @(posedge clk or negedge rst_n) begin
  if (!rst_n) begin
    q1 <= 1'b0;                    // Non-blocking: parallel register updates
    q2 <= 1'b0;                    // Non-blocking: models flip-flop behavior
  end else begin
    q1 <= d;                       // Non-blocking: avoids race conditions
    q2 <= q1;                      // Non-blocking: creates register chain
  end
end
Common Beginner Mistakes
Mistake #1: Using blocking assignments in sequential (clocked) logic
// WRONG - creates race conditions
always @(posedge clk) begin
  q1 = d;       // Blocking in sequential block
  q2 = q1;      // q2 gets NEW value of q1, not previous!
end
Why it's problematic: With blocking assignments, q2 immediately receives the new value of q1 (which is d), creating a wire instead of a register chain. In simulation, this might appear to work, but synthesized hardware will behave differently. The simulator evaluates statements in order, but actual hardware has no such ordering--all flip-flops clock simultaneously.
Best Practice: Always use non-blocking (<=) assignments in clocked blocks to model register behavior correctly:
// CORRECT - models register chain
always @(posedge clk) begin
  q1 <= d;      // Schedule assignment
  q2 <= q1;     // Captures OLD value of q1
end
Mistake #2: Using non-blocking assignments in combinational logic
// WRONG - creates synthesis mismatch
always @(*) begin
  temp <= a & b;      // Non-blocking in combinational
  c <= temp | d;      // May not see updated temp!
end
Why it's problematic: Non-blocking assignments schedule updates for the end of the time-step. In combinational logic, c may read the old value of temp, not the value just computed from a & b. This creates a simulation/synthesis mismatch--synthesis tools infer combinational logic (no registers), but simulation behaves as if there are registers.
Best Practice: Use blocking (=) assignments in combinational blocks to ensure immediate evaluation:
// CORRECT - immediate evaluation
always @(*) begin
  temp = a & b;       // Blocking: temp updated immediately
  c = temp | d;       // c sees new temp value
end
Mistake #3: Mixing blocking and non-blocking assignments to the same variable
// WRONG - unpredictable behavior
always @(posedge clk) begin
  if (condition1)
    counter = counter + 1;      // Blocking
  else
    counter <= counter - 1;     // Non-blocking
end
Why it's problematic: Mixing assignment types to the same variable creates a race condition. The final value of counter depends on the order in which the simulator processes blocking vs. non-blocking updates, which is undefined in the Verilog standard. Different simulators or even different simulation runs might produce different results.
Best Practice: Use only one assignment type per variable. For sequential logic, always use non-blocking:
// CORRECT - consistent assignment type
always @(posedge clk) begin
  if (condition1)
    counter <= counter + 1;     // Non-blocking
  else
    counter <= counter - 1;     // Non-blocking
end
Mistake #4: Relying on inter-block execution order with blocking assignments
// WRONG - assumes block execution order
always @(posedge clk) begin
  data_ready = 1'b1;            // Blocking in first block
end

always @(posedge clk) begin
  if (data_ready)               // Reads data_ready from parallel block
    process_data = data;        // May see old or new value!
end
Why it's problematic: The Verilog standard does not define the order in which parallel always blocks execute. One block might execute before the other, or they might interleave. This creates a race condition where data_ready might have its old value or new value when the second block reads it, leading to non-deterministic simulation results.
Best Practice: Never communicate between parallel blocks using blocking assignments. Use non-blocking assignments for registers, or use proper handshaking signals:
// CORRECT - deterministic behavior
always @(posedge clk) begin
  data_ready <= 1'b1;           // Non-blocking: updates at end of time-step
end

always @(posedge clk) begin
  if (data_ready)               // Reads previous cycle's value
    process_data <= data;       // Deterministic pipeline behavior
end
Summary
In this tutorial, you learned:
- Blocking assignments (
=) execute sequentially and immediately update the LHS variable--use them for combinational logic and testbench stimulus - Non-blocking assignments (
<=) evaluate the RHS immediately but update the LHS only at the end of the time-step--use them for sequential (clocked) logic - Time-step semantics determine when assignments take effect: blocking assignments update immediately, non-blocking assignments schedule updates for the end of the current time-step
- Mixing assignment types to the same variable or using the wrong type for the logic style creates race conditions, simulation/synthesis mismatches, and unpredictable behavior
- Golden rule: Use blocking (
=) for combinational logic, non-blocking (<=) for sequential logic, and never mix them for the same variable
