
10 min read | Intermediate Level
What You'll Learn
- What UVM is and why it became the industry standard for chip verification
- The evolution from OVM to UVM and the key improvements made
- Core UVM components: testbench structure, transactions, phases, and configuration
- Prerequisites for learning UVM and recommended learning path
What is UVM?
UVM (Universal Verification Methodology) is the industry-standard framework for verifying digital designs and systems-on-chip (SoCs) in the semiconductor industry. Built on top of SystemVerilog (IEEE 1800), UVM provides a comprehensive class library and methodology that enables engineers to create modular, reusable, and scalable verification environments.
Key Characteristics:
- Standardized: IEEE 1800.2 standard ensures interoperability across EDA tools and companies
- Modular: Pre-built base classes (drivers, monitors, scoreboards) accelerate development
- Reusable: Verification IP (VIP) can be shared across projects and organizations
- Configurable: Factory patterns and config_db enable flexible testbench adaptation
- Industry-Adopted: Supported by all major EDA vendors (Synopsys, Cadence, Mentor, Aldec)
Think of UVM as... A comprehensive construction framework for verification. Just as modern buildings use standardized architectural patterns (foundations, floors, walls), UVM provides standardized verification patterns (agents, sequences, scoreboards) that have been proven to work across many projects.
UVM in the Semiconductor Industry
UVM has become ubiquitous in chip verification. Chip companies use UVM to verify CPUs, GPUs, SoCs, and networking chips. A large verification environment is typically assembled from many reusable agents for protocols like PCIe, AXI, DDR, and proprietary interfaces. Without UVM's standardization, each company would build custom frameworks - wasting engineering effort and preventing IP reuse across the industry.
The Evolution: From OVM to UVM
OVM (Open Verification Methodology) - 2008
OVM was introduced in 2008 as an open-source verification methodology based on SystemVerilog. Developed by Mentor Graphics and Cadence, it provided the foundational concepts that later evolved into UVM:
- Base classes for verification components
- Transaction-Level Modeling (TLM) communication
- Phasing mechanism for testbench synchronization
- Factory pattern for configurability
UVM (Universal Verification Methodology) - 2011
UVM was introduced in 2011 as OVM's successor, addressing its limitations and becoming an Accellera (now IEEE) standard. UVM 1.0 was released in 2011, with subsequent revisions adding features and fixing issues.
Why OVM Was Replaced by UVM
UVM addressed four critical weaknesses in OVM:
1. Standardization
OVM Problem: Lacked a formal standard, causing vendor-specific implementations to diverge
UVM Solution: UVM is an Accellera standard, later adopted by the IEEE as 1800.2, with one reference implementation shared by all EDA tools
2. One Methodology
OVM Problem: A competing methodology, VMM, split users and verification IP between two incompatible libraries
UVM Solution: Merges OVM with ideas from VMM, such as the register layer, into one methodology
3. Reusability
OVM Problem: Components not always modular; tight coupling between testbench and DUT
UVM Solution: Clear separation between verification components and DUT; agents are self-contained modules
4. Maintainability
OVM Problem: Changes to methodology broke existing testbenches
UVM Solution: Backward compatibility emphasis; deprecation warnings instead of abrupt changes
Migration Path: OVM users could migrate to UVM relatively painlessly since UVM retained OVM's core architecture. Most projects transitioned in 2011-2013, and OVM is now obsolete. If you encounter OVM code today, convert it to UVM - all modern tools support UVM, not OVM.
What Does UVM Contain?
UVM provides a comprehensive set of features for professional verification. Here's what's included:
1. Testbench Components
UVM provides base classes that verification engineers extend to create custom components:
- uvm_driver: Converts transactions into pin-level DUT stimulus
- uvm_monitor: Observes DUT signals and reconstructs transactions
- uvm_scoreboard: Compares actual DUT behavior against expected results
- uvm_agent: Groups driver, monitor, and sequencer for a protocol interface
- uvm_env: Top-level container for all verification components
- uvm_test: Defines test scenarios and controls simulation flow
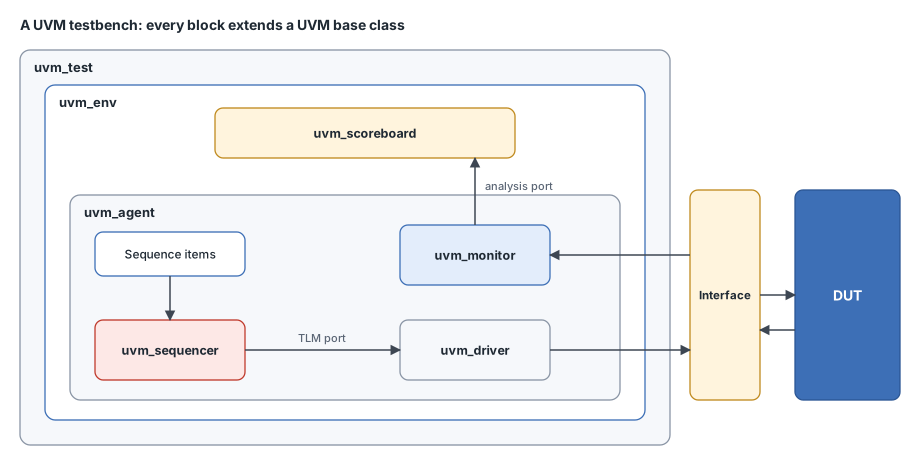
The diagram shows how verification engineers extend UVM base classes (prefixed with uvm_*) to create custom components. These base classes already contain the infrastructure for communication, synchronization, and reporting - you focus on protocol-specific logic.
2. Transactions
Transactions model communication between the DUT and testbench. Instead of manipulating individual signals, you work with high-level transaction objects:
// Example: PCIe transaction
class pcie_transaction extends uvm_sequence_item;
  rand bit [63:0] address;       // 64-bit address
  rand bit [31:0] data[];        // Payload (dynamic array)
  rand pcie_type_e trans_type;   // Read/Write/Message

  `uvm_object_utils_begin(pcie_transaction)
    `uvm_field_int(address, UVM_ALL_ON)
    `uvm_field_array_int(data, UVM_ALL_ON)
    `uvm_field_enum(pcie_type_e, trans_type, UVM_ALL_ON)
  `uvm_object_utils_end

  // UVM provides automatic print, copy, compare for this transaction
endclass
Transactions abstract protocol details, making testbenches more readable and maintainable than RTL signal-level code.
3. Phases
Phases control the order of testbench construction and execution. UVM defines standard phases that all components traverse:
- build_phase: Construct components hierarchically (top-down)
- connect_phase: Establish TLM connections between components
- end_of_elaboration_phase: Perform final checks before simulation
- run_phase: Execute stimulus and monitoring (consumes simulation time)
- extract_phase: Collect coverage and results
- check_phase: Verify pass/fail criteria
- report_phase: Print final summary
Phase Benefits: Phases eliminate race conditions and ensure deterministic testbench behavior. All scoreboards are built before drivers start sending stimulus. All monitoring completes before checking begins. This synchronization happens automatically - no manual coordination needed.
4. Messaging and Reporting
UVM's reporting infrastructure provides severity-based messages with automatic file/line tracking:
// UVM reporting macros
`uvm_info("MONITOR", $sformatf("Received transaction: %s", txn.convert2string()), UVM_MEDIUM)
`uvm_warning("DRIVER", "Bus timeout detected - retrying transaction")
`uvm_error("SCOREBOARD", $sformatf("Mismatch: expected=0x%0h, actual=0x%0h", exp, act))
`uvm_fatal("CONFIG", "Interface handle is null - cannot continue")
Messages can be filtered by severity, component, or ID - useful for debugging specific areas without overwhelming log files.
5. Configuration Database (config_db)
The configuration database passes settings and objects between components without tight coupling:
// Test sets interface handle
uvm_config_db#(virtual apb_if)::set(null, "uvm_test_top.*", "vif", apb_vif);

// Agent retrieves interface handle
if (!uvm_config_db#(virtual apb_if)::get(this, "", "vif", m_vif))
  `uvm_fatal(get_type_name(), "Interface not found in config_db")
This centralized configuration mechanism replaces global variables and hardcoded settings, improving testbench flexibility.
6. Functional Coverage
UVM integrates with SystemVerilog's functional coverage features, tracking which scenarios have been tested:
covergroup pcie_cg;
  address_cp: coverpoint txn.address {
    bins low  = {[0:32'hFFFF]};
    bins mid  = {[32'h10000:32'hFFFFFFF]};
    bins high = {[32'h10000000:64'hFFFFFFFF]};
  }
  type_cp: coverpoint txn.trans_type;
  cross address_cp, type_cp;  // Ensure all address ranges tested with all types
endgroup
Coverage data reveals verification holes - addresses or scenarios never exercised by stimulus.
7. Register Abstraction Layer (RAL)
The register model simplifies DUT register access and verification:
// Write register using high-level API
reg_model.control_reg.write(status, 32'hDEADBEEF);

// Read and compare
reg_model.status_reg.read(status, rdata);
if (rdata != 32'h12345678)
  `uvm_error("REG_CHECK", "Status register mismatch")

// Built-in register tests (reset values, access policies) are sequences, for example uvm_reg_hw_reset_seq
uvm_reg_hw_reset_seq reset_seq = new(); reset_seq.model = reg_model; reset_seq.start(null);
RAL automatically handles bus protocols, address mapping, and mirror values - dramatically reducing register verification effort.
UVM in Large-Scale Verification Projects
A modern SoC might contain 100+ IP blocks, each with dozens of configuration registers. Without UVM's register model, verification teams would write thousands of lines of bus protocol code to access each register. With UVM RAL, the register model is auto-generated from RTL or specifications, providing instant read/write APIs, automatic reset checking, and mirror synchronization. This is why UVM register models are mandatory in professional verification - they save a great deal of engineering effort.
UVM Resources and Standards
UVM undergoes periodic revisions adding features and deprecating outdated practices. The official UVM reference manual (IEEE 1800.2) can be obtained from the Accellera UVM page.
UVM Versions:
- UVM 1.0 (2011) - Initial release
- UVM 1.1 (2011-2013) - Refinement releases 1.1 through 1.1d, which a lot of older code targets
- UVM 1.2 (2014) - The last Accellera release, with API clean-ups and some deprecations
- IEEE 1800.2 (2017, revised 2020) - The IEEE standard version of UVM
Learning Tip: The UVM reference manual is comprehensive but dense (several hundred pages). Use it as a reference, not a tutorial. Start with practical examples and tutorials (like this course), then consult the manual for detailed class descriptions and advanced features.
Prerequisites for Learning UVM
Before diving into UVM, ensure you have these foundational skills:
1. SystemVerilog Language Proficiency
Required Knowledge:
- Object-Oriented Programming: classes, inheritance, polymorphism, virtual methods
- Randomization: rand, randc, constraints, pre_randomize/post_randomize
- Interfaces: modports, clocking blocks
- Data types: dynamic arrays, queues, associative arrays, mailboxes
- Advanced features: parameterized classes, typedef, enums
Click here to refresh SystemVerilog concepts!
Why It Matters: UVM is written entirely in SystemVerilog and heavily uses OOP. Without solid SystemVerilog knowledge, UVM code will be incomprehensible.
2. Simulation Tool Familiarity
You should know how to use at least one major simulator:
- Synopsys VCS: Industry-leading simulator with excellent UVM support
- Cadence Xcelium: High-performance simulator with advanced debugging
- Mentor Questa: Popular simulator with integrated verification features
- Aldec Riviera-PRO: Cost-effective simulator with UVM support
Typical workflow: compile testbench, run simulation with +UVM_TESTNAME=my_test, analyze waveforms and logs.
3. Verification Methodology Understanding
Basic verification concepts you should know:
- Directed Testing: Writing specific test sequences to target known scenarios
- Constrained Random: Generating randomized stimulus within legal constraints
- Functional Coverage: Measuring which design features have been exercised
- Assertions: Using SVA to check temporal properties automatically
- Self-Checking: Scoreboards that automatically detect DUT errors
UVM Learning Curve in Industry
A typical ramp-up for a new verification engineer looks like this:
- Week 1-2: SystemVerilog OOP refresher and basic UVM concepts.
- Week 3-4: Build a simple UVM testbench from scratch (UART, I2C, SPI).
- Week 5-8: Work on a real project under mentorship, extending existing environments.
- Month 3-6: Independent contribution to verification IP development.
Common Mistakes
Mistake #1: Trying to Learn UVM Without SystemVerilog OOP
Wrong: Jump directly into UVM tutorials without understanding classes, inheritance, or virtual methods
Right: Master SystemVerilog OOP first (at least 2-3 weeks of practice), then start UVM
Why? UVM is built entirely on SystemVerilog OOP. Concepts like super.build_phase(), uvm_driver#(T) parameterization, and factory overrides are incomprehensible without OOP knowledge. Skipping prerequisites leads to frustration and superficial understanding.
Mistake #2: Reading the UVM Reference Manual First
Wrong: Start by reading the UVM reference manual cover-to-cover
Right: Start with practical tutorials and examples, use the manual as a reference when needed
Why? The UVM spec is a technical reference, not a learning resource. It describes every class method in detail but doesn't explain why or when to use them. Learn by doing - build testbenches following tutorials, then consult the spec for specific questions.
Mistake #3: Trying to Understand All of UVM at Once
Wrong: Attempt to learn phases, sequences, TLM, factory, config_db, and RAL simultaneously
Right: Learn incrementally: basic structure → driver/monitor → sequences → config_db → advanced topics
Why? UVM is vast. Most day-to-day work uses a small core of UVM's features. Master the fundamentals first (components, phases, basic sequences). Add complexity gradually as projects demand it. Register models, callbacks, and advanced sequences come later.
Mistake #4: Not Running Code While Learning
Wrong: Read UVM tutorials passively without typing/running code
Right: Type every example yourself, run simulations, modify code, break things intentionally
Why? UVM has subtle behaviors that only become clear through experimentation. What happens if you don't call super.build_phase()? What if config_db::get() fails? You learn these lessons by making mistakes in controlled practice environments, not by reading.
Practice Exercise
Challenge: Assess Your UVM Readiness
Before starting UVM development, verify you have the necessary prerequisites. Answer these questions honestly:
- Can you write a SystemVerilog class with inheritance, virtual methods, and constraints?
- Do you understand the difference between shallow copy vs deep copy of objects?
- Can you explain what
randandrandcdo differently? - Have you used
interfacewithclocking blockandmodport? - Do you know how to compile and run a basic SystemVerilog testbench in your simulator?
Hint: Self-Assessment Guide
If you answered "no" or "unsure" to more than 2 questions, spend 1-2 weeks reviewing SystemVerilog fundamentals before proceeding with UVM. Focus especially on OOP concepts (classes, inheritance, polymorphism, virtual methods).
Recommended Learning Path
If you're ready for UVM (all questions answered "yes"):
- Read UVM Introduction
- Build your first testbench: Hello UVM
- Add stimulus generation: UVM Driver
- Learn sequencer-driver communication: UVM Sequencer
- Master UVM phases: UVM Phases
If you need SystemVerilog review (answered "no" to 3+ questions):
- Review SystemVerilog Tutorial
- Practice writing classes with inheritance and constraints
- Build a simple non-UVM testbench using classes and interfaces
- Then return to UVM tutorials
Solution: Key Concepts Explanation
Question 1: Class with inheritance and virtual methods
  class animal;
    virtual function void make_sound();
      $display("Generic animal sound");
    endfunction
  endclass

  class dog extends animal;
    virtual function void make_sound();
      $display("Woof!");  // Override parent's method
    endfunction
  endclass
Question 2: Shallow vs Deep Copy
- Shallow: Copies object handle (both objects point to same data)
- Deep: Creates completely independent copy of all fields
Question 3: rand vs randc
- rand: Can repeat values (e.g., 1, 3, 1, 2, 3, 1...)
- randc: Cyclic random - all values before repeating (e.g., 1, 3, 2, then cycle: 3, 1, 2...)
Question 4: Interface with clocking block
  interface apb_if(input clk);
    logic [31:0] paddr, pwdata, prdata;
    logic pwrite, penable;

    clocking cb @(posedge clk);
      output paddr, pwdata, pwrite, penable;
      input prdata;
    endclocking

    modport master (clocking cb);
  endinterface
Question 5: Compile and run
  # VCS example
  vcs -sverilog -ntb_opts uvm testbench.sv
  ./simv +UVM_TESTNAME=base_test
Assessment: If these concepts are clear, you're ready for UVM. If not, review SystemVerilog OOP chapters before proceeding.
Summary
In this tutorial, you learned:
- UVM is the IEEE 1800.2 industry standard for digital design verification, providing modular, reusable testbench infrastructure
- UVM evolved from OVM (2008) with improvements in standardization, flexibility, reusability, and maintainability
- UVM provides 7 core features: testbench components, transactions, phases, messaging, config_db, coverage, and register models
- UVM components (driver, monitor, scoreboard, agent, env, test) extend base classes that handle infrastructure automatically
- Phases (build, connect, run, check, report) ensure deterministic testbench construction and synchronization
- Prerequisites: Strong SystemVerilog OOP, simulator familiarity, and basic verification methodology knowledge
- Learn UVM incrementally - start with basic examples, not the reference manual
