
Security validation on silicon checks that the chip's protections actually work in hardware: debug locks hold in every lifecycle state, keys cannot be read out, secure boot cannot be bypassed, and the chip resists physical attacks such as glitching and power analysis. Unlike functional validation, it mostly tests what must not happen. This article describes the main areas, how negative testing works, and the attacks teams try on their own silicon.
7 min read | Intermediate
What You'll Learn
- Plan negative tests for debug locks and lifecycle states
- Validate fuses, keys and secure boot on silicon
- Describe fault injection and side-channel testing
- Explain why security validation repeats on every stepping
Testing What Must Not Happen
A functional test passes when the chip does the right thing. A security test passes when an attempt fails: a debug read returns nothing, an unsigned image does not boot, a wrong key does not unlock.
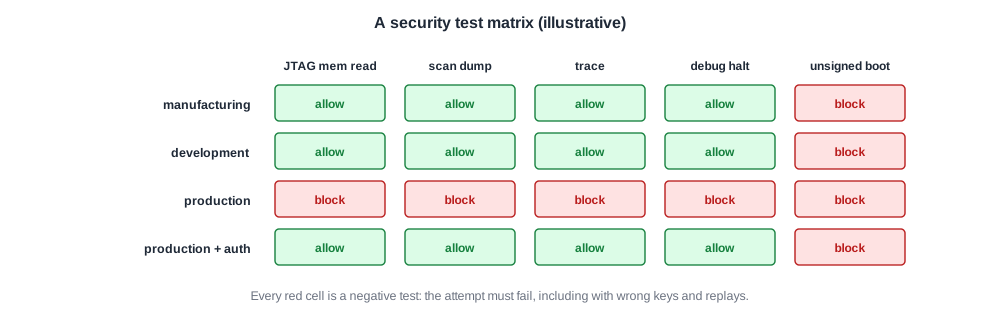
Negative tests need a clear list of what each state must forbid, taken from the security requirements, and a test for each item. Missing a single path, such as trace still reachable while JTAG is locked, defeats the rest.
Debug Locks and Lifecycle States
- Move parts through every lifecycle state, and check each debug path is open or blocked as specified.
- Try to unlock with no key, a wrong key, an expired credential and a replayed response; all must fail.
- Check that a transition cannot be reversed and that interrupted transitions leave the part in a safe state.
- Check that scan state is cleared when test mode is entered from normal operation.
Quick Check
Q: Why test what happens if power is removed in the middle of a lifecycle transition?
Show Answer
A partly programmed fuse set might leave the part in an undefined state. If that state defaults to open debug, an attacker could deliberately cut power during the transition to gain access. The part must fail safe, to the more restricted state.
Fuses, Keys and Secure Boot
Fuses must program reliably, read back correctly across voltage and temperature, and never be readable from outside when they hold secrets. Keys must be usable by the crypto engine but invisible to debug, trace and software. Secure boot is tested by trying to boot images that are unsigned, signed with the wrong key, corrupted, or older versions that should be rejected, and by checking that failures leave the chip locked rather than in a debug-friendly state.
Physical Attacks
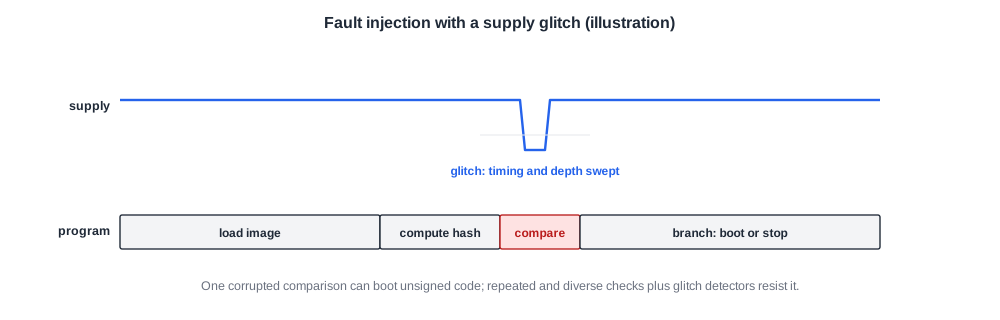
- Fault injection: short glitches on the supply or clock, electromagnetic pulses or laser pulses can make a single check produce the wrong answer, such as skipping a signature comparison. Teams sweep glitch timing and strength while the chip runs a security check, looking for any setting that bypasses it.
- Side channels: power consumption, electromagnetic emission and timing can depend on secret data. Recording many traces while the chip uses a key and analysing them statistically can reveal the key.
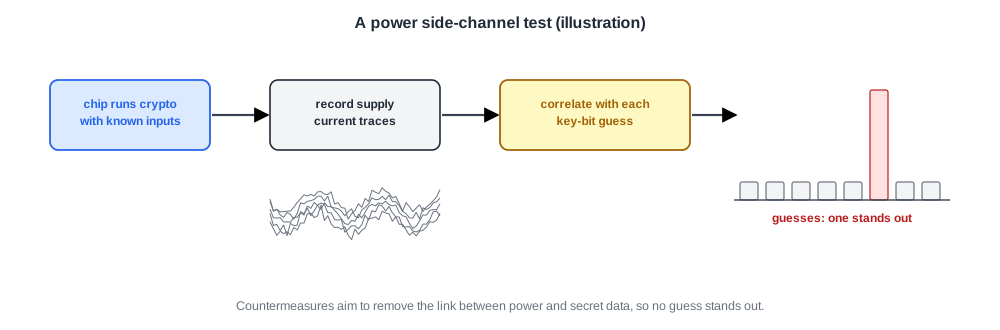
These tests use the same benches and on-die monitors as electrical validation, so they fit naturally into the post-silicon lab.
Quick Check
Q: A secure boot check is a single comparison followed by a branch. Why is it a target for glitching?
Show Answer
One wrong result, at one moment, changes the decision. A well-timed glitch that corrupts the comparison or skips the branch boots unsigned code. Countermeasures include repeating checks, checking them in different ways, and detecting glitches.
In Practice
Many companies use separate attack teams who try to break the silicon without being told how the protections work. Their findings are treated like bugs, with workarounds or fixes, as in Workarounds. Because any change can open a path, security tests join the regression suite and run on every new stepping and firmware release, as described in Validating a New Stepping.
Common Mistakes
Mistake #1: Testing only the intended unlock path
Attackers use wrong keys, replays, interrupted transitions and glitches. Test them all.
Mistake #2: Checking JTAG but forgetting other debug paths
Trace, scan and debug registers need their own negative tests.
Mistake #3: Running security tests once
Repeat them on every stepping and firmware release.
Practice Exercise
Challenge: Glitch Search Size
A boot check lasts 2 µs. A glitch search sweeps timing in 10 ns steps across that window, and 8 glitch depths at each timing, with 20 attempts per setting because glitch effects are random.
Each attempt takes 50 ms including reset. How long does one full sweep take?
Hint
Settings = timing steps x depths; attempts = settings x 20.
Solution
Timing steps: 2 µs / 10 ns = 200. Settings: 200 x 8 = 1,600.
Attempts: 32,000, at 50 ms each = 1,600 s, about 27 minutes. That is affordable, so sweeps are repeated across voltages, temperatures and parts.
Summary
- Security validation tests that forbidden actions fail, for every path and lifecycle state.
- Unlock attempts with wrong keys, replays and interrupted transitions must all fail safe.
- Fuses, keys and secure boot are checked across conditions and with bad images.
- Fault injection and side-channel tests probe physical attacks, and tests repeat every stepping.