
Wiring a design's ports directly to a handful of testbench variables works fine for a simple design like a binary counter. But real designs have hundreds of ports, dozens of test scenarios, and teams of engineers who all need to reuse the same verification code across projects. A single, tangled testbench module doesn't hold up at that scale. This article breaks a testbench down into the standard components that make it modular, scalable, and reusable.
9 min read | Beginner Level
What You'll Learn
- Why a simple, directly-wired testbench doesn't scale to real designs
- The standard components of a SystemVerilog testbench and what each one does
- How stimulus flows from generator to DUT, and results flow back to the scoreboard
- Why environments and tests are kept as separate, reusable layers
What Is the Purpose of a Testbench?
A testbench is the environment that lets you verify a design's functionality through simulation. It's a container where the design is placed and driven with input stimulus. At a high level, a testbench needs to:
- Generate different types of input stimulus
- Drive the design's inputs with that stimulus
- Let the design process the input and produce an output
- Check the output against expected behavior to catch functional defects
- If a bug is found, fix the design and repeat until no defects remain
Components of a Testbench
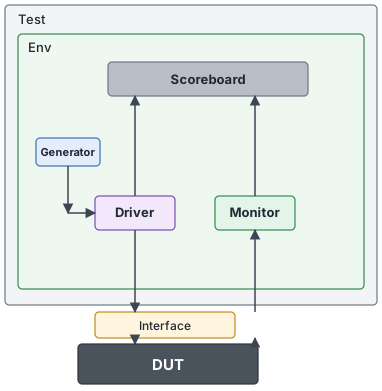
Wiring a design's ports directly to testbench variables works for a small example, but it isn't modular, scalable, or reusable. A proper testbench splits these responsibilities across dedicated components:
| Component | Description |
|---|---|
| Generator | Generates different input stimulus to be driven to the DUT |
| Interface | Contains design signals that can be driven or monitored |
| Driver | Drives the generated stimulus to the design |
| Monitor | Watches the design's input-output ports to capture design activity |
| Scoreboard | Checks output from the design against expected behavior |
| Environment | Contains all the verification components listed above |
| Test | Contains the environment, configured with specific settings |
What Is DUT?
DUT stands for Design Under Test — the hardware design written in Verilog, SystemVerilog, or VHDL. The term DUT is typically used in post-silicon validation, once the chip has been fabricated. In pre-silicon verification, the same design is often called DUV (Design Under Verification) instead.
// All verification components are placed in this top testbench module
module tb_top;

	// Declare variables that need to be connected to the design instance
	// These variables are assigned some values that in turn gets transferred to
	// the design as inputs because they are connected with the ports in the design
	reg clk;
	wire en;
	wire wr;
	wire data;

	// Instantiate the design module and connect the variables declared above
	// with the ports in the design
	design myDsn ( .clk (clk),
	               .en  (en),
	               .wr  (wr),
	               . ...
	               .rdata);

	// Develop rest of the testbench and write stimulus that can be driven to the design
endmodule
Click here for a complete SystemVerilog testbench example !
What Is an Interface?
If a design has hundreds of port signals, connecting, maintaining, and reusing them individually gets cumbersome fast. Instead, all of the design's input-output ports are bundled into a single container called an interface. The design is then driven and observed entirely through this interface rather than through loose, individually-declared signals.
What Is a Driver?
The driver is the component that does the actual pin-wiggling on the DUT, through tasks defined in the interface. When the driver needs to send input values to the design, it simply calls a pre-defined task in the interface — it doesn't need to know the timing relationships between signals, since that timing is already encoded inside the task. This abstraction is what makes testbenches flexible and scalable: if the interface's timing changes later, the driver still calls the same task and doesn't need to be rewritten.
How Does the Driver Know What to Drive?
The generator creates valid data transactions and sends them to the driver, which simply drives whatever data it receives through the interface. These transactions are implemented as class objects. The driver's job is to take a data object from the generator and translate it into signal-level activity the DUT can understand.
Quick Check
Q: If the driver doesn't decide what data to send to the DUT, which component does?
Show Answer
The generator. It creates the data transactions; the driver's only job is to translate and drive whatever it's handed.
Why Is a Monitor Required?
Driving data into the DUT is only half the job — the real goal is verifying the design's behavior. The DUT processes input data and produces output on its pins. The monitor passively observes this processed data, converts it into a data object, and sends it to the scoreboard for checking.
Common Misconception: The monitor never drives any signal. It's a purely passive, observe-only component — driving is strictly the driver's job.
What Is the Purpose of a Scoreboard?
The scoreboard typically contains a reference model that mimics the DUT's expected behavior. The same input sent to the DUT is also sent to this reference model. If the DUT has a functional bug, its output won't match the reference model's output. Comparing the two tells you whether the design has a functional defect — and this comparison is usually done inside the scoreboard.
Where Are These Components Used?
UVM (Universal Verification Methodology) formalizes exactly these roles into base classes — uvm_driver, uvm_monitor, uvm_scoreboard, uvm_env, and uvm_test — so verification teams working on processors, GPUs, or SoC sub-blocks build on a standardized version of this same architecture rather than reinventing it each time.
Why Is an Environment Required?
The environment bundles the generator, driver, monitor, and scoreboard together into one reusable unit. This makes verification more flexible and scalable, since the same environment can be reused across many tests — and even future projects — without being rebuilt each time.
What Does the Test Do?
The test instantiates the environment and configures it however that particular test scenario needs. A real project might have thousands of tests, and it wouldn't be feasible to directly modify the environment for each one. Instead, the environment exposes knobs and parameters that each test can tweak, giving the test writer control over stimulus generation without touching the environment's internals.
This is the layering that makes verification reusable: the environment defines reusable structure, and each test only supplies configuration on top of it.
If you only had to verify a simple digital counter with 50 lines of RTL, wiring signals directly (as in the intro article) would honestly be enough. But as design complexity grows, so does the need for this layered abstraction.
What Are Abstraction Levels?
Earlier examples toggled the design using individual signal assignments directly:
#5  resetn <= 0;
#20 resetn <= 1;
Instead, wrapping these two lines in a task called apply_reset creates a reusable component that hides the details of exactly which signals get asserted and for how long:
module tb_top;

	bit resetn;

	task apply_reset ();
		#5  resetn <= 0;
		#20 resetn <= 1;
	endtask

	initial begin
		apply_reset();
	end
endmodule
This is exactly the kind of abstraction a testbench should provide — hiding the "how" so the test writer can focus on "when" and "why" a task should be used. In practice, a test writer mostly calls tasks and configures the environment, rather than writing raw signal assignments.
Click here for another complete SystemVerilog testbench example !
Common Beginner Mistakes
Mistake #1: Confusing the generator with the driver.
The generator decides what data to send; the driver decides how to physically wiggle pins to send it. Beginners often assume the driver also creates the data — it doesn't, it only translates and drives what the generator hands it.
Mistake #2: Putting signal timing (when to sample or drive) directly in the driver or test instead of inside interface tasks.
If timing details leak outside the interface, changing the DUT's timing later means changing every place that touches those signals, instead of just the interface task.
Mistake #3: Treating the environment and the test as the same thing.
The environment holds the reusable verification components; the test only configures and runs that environment with specific settings. One environment is typically reused across many tests.
Practice Exercise
Challenge: Map the Components
Sketch (on paper or in a text file) the path data takes through a testbench for a single transaction, from stimulus creation to pass/fail result. Label each step with the component responsible: Generator, Driver, Interface, DUT, Monitor, Scoreboard.
Hint
There are two directions of data flow to trace separately: one path drives data into the DUT, and a second path carries the DUT's response back out for checking.
Solution
Drive path: Generator creates a transaction → Driver receives it → Driver calls an interface task → Interface drives DUT input pins.
Check path: DUT produces output pins → Interface signals are observed → Monitor samples the activity and builds a data object → Scoreboard compares it against its reference model's expected result.
Summary
In this tutorial, you learned:
- A directly-wired testbench doesn't scale — real testbenches split responsibilities across dedicated components
- The Generator creates stimulus, the Driver applies it, and the Interface bundles the signals in between
- The Monitor passively observes DUT activity and reports it to the Scoreboard for checking
- The Environment bundles all verification components into one reusable unit
- The Test configures and runs an Environment with specific settings, without modifying the Environment itself
