
Every bug that surfaces during verification follows a predictable journey — from the moment a test fails to the moment the design team signs off that the problem is truly gone. Understanding this lifecycle is as important as knowing how to write a testbench, because it defines how DV engineers communicate with RTL designers, how progress is measured, and how teams avoid shipping broken silicon.
10 min read | Intermediate Level
What You'll Learn
- The six stages a bug passes through from discovery to closure
- How severity and priority are assigned during triage
- What makes a useful, reproducible bug report
- Why regression testing is essential after every RTL fix
The Six Stages of a Bug
Once a simulation failure is confirmed as a real design bug rather than a testbench issue, it enters a formal tracking system. Most teams use a bug-tracker (Jira, Bugzilla, or an internal tool). The bug moves through six well-defined states:
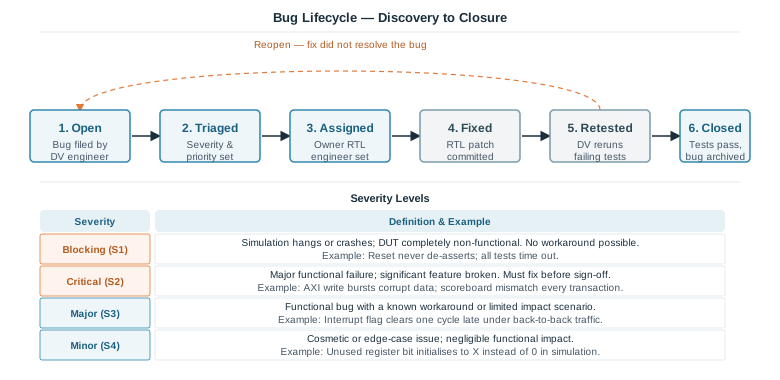
Stage 1 — Open
The DV engineer files the bug after confirming two things: the simulation failure is reproducible, and the root cause is most likely in the RTL rather than the testbench itself. This distinction matters — a misconfigured scoreboard or an incorrect expected value in the testbench can produce the same symptom as a genuine design bug, and filing a ticket prematurely wastes the design team's time. Once the DV engineer is confident the testbench is not at fault, they open a ticket containing a title, a description of the failure, and the exact simulation command and seed needed to reproduce it. Nothing is assigned yet.
Bug tracking platforms: In industry, bugs are filed in a dedicated tracking tool rather than email or spreadsheets. The most common platforms are Jira (widely used across semiconductor companies for its customisable workflows and integration with Git), Bugzilla (older but still found in many established design teams), and internal proprietary trackers built on top of databases like those integrated into Cadence Xcelium or Synopsys simulation flows. Regardless of the platform, the core fields are the same: ticket ID, title, severity, priority, assignee, status, and reproduction steps.
Stage 2 — Triaged
During triage, the ticket is reviewed — sometimes in a dedicated daily meeting, sometimes informally between the DV lead and the designer — to determine severity and priority. Severity describes how bad the bug is functionally. Priority describes how urgently it must be fixed relative to the schedule. For example, a bug where a debug-only read-only register displays a slightly stale cycle count in simulation — with no effect on any functional path — might have low severity and low priority. A bug that causes the chip's bus interface to hang under back-to-back transactions has high severity and high priority. The two are related but not the same — a low-severity bug can be bumped to high priority if it is blocking another team's integration work.
Stage 3 — Assigned
The RTL designer responsible for the affected block takes ownership. The DV engineer who filed the bug may be asked to provide additional waveform snapshots, a stripped-down reproducer test, or clarification on expected behaviour from the design specification.
Stage 4 — Fixed
The RTL designer commits a patch to the design repository and updates the bug ticket with the commit identifier and a brief explanation of the root cause. The DV engineer must not close the bug at this point — a fix claim is not the same as a verified fix.
Stage 5 — Retested
The DV engineer pulls the updated RTL, reruns the original failing test with the same seed, and runs the full regression suite for that block. This step exists because RTL changes can introduce regressions — bugs in previously passing scenarios that the patch accidentally broke.
Stage 6 — Closed
Only after all relevant tests pass does the DV engineer close the ticket. How the failing scenario is preserved for future regressions depends on how reliably it can be reproduced. If the same seed consistently triggers the failure, it is added to the regression suite and monitored over several runs to confirm the fix holds. If the failure was a rare hit — appearing only once across thousands of seeds — a dedicated directed test that explicitly targets the failing condition is written instead, since relying on a lucky seed to reappear is not a dependable regression strategy.
If the retested fix still fails, the bug is reopened and returns to the Assigned stage. The reopen rate is a useful metric — a high reopen rate suggests the design team is committing insufficiently reviewed patches.
Triage — Severity and Priority in Practice
Assigning severity correctly matters because it drives fix order. Teams typically define four severity levels:
| Severity | Definition | Typical Action |
|---|---|---|
| Blocking (S1) | Simulation crashes or hangs; entire verification flow is stopped | Fix today; nothing else proceeds |
| Critical (S2) | Major functional failure; feature does not work correctly | Fix before sign-off milestone |
| Major (S3) | Functional bug with a known workaround or narrow impact | Fix scheduled in current sprint |
| Minor (S4) | Cosmetic or extreme corner case; negligible functional impact | Fix if time allows; may be waived |
Priority (P1–P3) is set separately and reflects schedule pressure. An S3 bug blocking another team's integration work might be elevated to P1 priority even though it is not a critical functional failure.
Quick Check
Q: A simulation produces wrong output data on every AXI write transaction. The design team confirms it is an RTL bug. What severity level should this receive, and why?
Show Answer
This is Critical (S2). The AXI write path is a major feature and it is producing incorrect results on every transaction — there is no workaround that allows verification to continue normally. S1 (Blocking) would apply only if simulation itself crashes or cannot run at all.
Writing a Useful Bug Report
A bug report that cannot be reproduced wastes everyone's time. Every ticket should contain at minimum:
- Title: A one-line description identifying the block, the signal or feature, and the symptom. For example: "AXI slave — BRESP asserted two cycles late after write burst of length 16"
- Simulation command and seed: The exact command line used to run the simulation, including the randomisation seed. Without the seed, a random test is not reproducible.
- Expected behaviour: What the design specification says should happen.
- Observed behaviour: What the simulation actually produced — include the simulation timestamp and signal values where possible.
- Waveform reference: A screenshot or VCD dump marker pointing to the failure window.
- RTL version: The Git commit hash of the RTL under test. RTL is being actively modified; a bug filed against yesterday's commit may already be fixed — or may behave differently — on today's code.
Attach a minimal reproducer: a stripped-down directed test that triggers the bug with no randomisation. This makes the RTL designer's debug loop much faster and removes any ambiguity about whether a fix actually works.
Root Cause Analysis — Finding the RTL Line, Not Just the Symptom
When the RTL designer picks up a bug, their first task is root cause analysis (RCA). The symptom visible in the waveform — for example, a wrong data value on the output bus — is rarely where the actual error lives. The real cause might be a missing reset on a counter three pipeline stages earlier, or an FSM transition that fires one cycle too soon under a specific handshake condition.
The DV engineer can help by providing a signal trace that works backward from the symptom to the first point where signal values diverge from the specification. Assertions embedded in the testbench are especially valuable here — a well-placed concurrent assertion that fires close to the source of the bug can cut debug time significantly compared to chasing a corrupted output bus back through the pipeline manually.
Root cause analysis produces two outputs: the RTL fix itself, and a written explanation of why the bug occurred. The written explanation feeds back into the verification plan — it may reveal missing cover points or constraints that allowed the scenario to be underexercised.
Regression on Bug Fixes — Preventing Regressions
Every RTL patch carries risk. A designer fixing a state machine transition timing issue may inadvertently affect a related path that was previously correct. This is called a regression — a previously passing test that now fails after a change.
The retest step therefore does two things. First, it reruns the originally failing test to confirm the fix works. Second, it runs the full block-level regression suite to confirm nothing else broke. In a healthy project workflow, every RTL commit triggers an automated regression run in CI (continuous integration), so regressions are caught within hours of being introduced rather than days later during a manual re-run.
Never close a bug based solely on the RTL designer's statement that the fix is in. Always retest against the updated RTL and verify the full regression is green before marking the ticket closed.
Quick Check
Q: After an RTL fix is committed, the originally failing test now passes. Is it safe to close the bug?
Show Answer
Not yet. The full block-level regression must also pass before the bug is closed. The original test confirms the specific scenario is fixed, but regression confirms the patch did not break anything that was previously working. Only when both conditions are met should the ticket move to Closed.
Common Mistakes
Mistake 1: Missing the randomisation seed in the bug report.
Wrong: Filing the bug with only the simulation command, e.g. vsim tb_top, and no seed.
Right: Always record the full command including the seed: vsim -sv_seed 0xA3F1 tb_top.
Why? A constrained-random test produces different stimulus on every run. Without the seed, the RTL designer cannot reproduce the exact sequence of transactions that triggered the failure, making the bug effectively impossible to debug.
Mistake 2: Closing the bug as soon as the originally failing test passes.
Wrong: Marking the ticket Closed the moment the specific failing test goes green after an RTL patch.
Right: Run the full block-level regression suite first, then close only when all tests pass.
Why? An RTL patch that fixes one scenario can silently break another. If regression is skipped, the regression failure will not surface until the next nightly run — by which point additional RTL changes may have been stacked on top, making isolation much harder.
Mistake 3: Filing a symptom rather than a proper bug description.
Wrong: Title reads "Scoreboard mismatch at time 4200ns" with no further detail.
Right: Identify the specific output that is wrong, the expected value, the observed value, and the input conditions that triggered the failure.
Why? A symptom tells the designer that something is wrong but not what or where. A complete bug report reduces the back-and-forth between DV and RTL teams and gets the fix committed faster.
Practice Exercise
Challenge: Write a Bug Report
A constrained-random test running with seed 0xA3F1 produces a scoreboard mismatch. The DUT is a simple FIFO. The expected read data is 0xDEAD but the actual read data at simulation time 9800ns is 0x0000. The simulation command is vsim -sv_seed 0xA3F1 tb_fifo and the RTL commit is git:3f7c2a1.
Write a complete bug report title and body using the fields described in this article.
Hint
The title should name the block (FIFO), the signal or feature (read data), and the symptom (incorrect value). The body should include seed, simulation command, RTL commit, expected vs observed values, and the simulation timestamp.
Sample Answer
Title: FIFO — Read data returns 0x0000 instead of 0xDEAD after write-then-read sequence (seed 0xA3F1)
Simulation command: vsim -sv_seed 0xA3F1 tb_fifo
RTL commit: 3f7c2a1
Expected: Read data = 0xDEAD at time 9800ns per FIFO specification (first-in-first-out order preserved)
Observed: Read data = 0x0000 at time 9800ns — scoreboard mismatch triggered
Waveform: See attached VCD; cursor at 9800ns shows rd_data stuck at zero while rd_valid is asserted
Reproducer: Directed test available — write 0xDEAD, assert read enable, check output
Summary
In this article, you learned:
- A bug passes through six stages: Open, Triaged, Assigned, Fixed, Retested, and Closed
- Severity (S1–S4) describes functional impact; priority (P1–P3) describes schedule urgency — they are set independently
- A useful bug report always includes the simulation seed, RTL commit hash, expected vs observed behaviour, and a reproducer
- Every RTL fix must be followed by a full regression run to catch regressions before the ticket is closed