
10 min read | Intermediate Level
Every verification engineer writes a testbench. But the testbench you write for a 50-gate counter looks nothing like the testbench used to verify a 500-million-gate SoC. The gap between those two environments was not bridged in a single step — it took decades of iteration, each generation of testbench solving the problems of the previous one while introducing new constraints that pushed the next evolution forward.
Understanding this progression is not just history. Each generation maps to a real engineering tradeoff you will face on every project: how much structure do you need, how much reuse do you want, and how much effort are you willing to invest upfront to save time later? Knowing why each style exists helps you choose the right one for the task at hand.
What You'll Learn
- The progression from linear testbenches to UVM and what problem each generation solved
- Why reusability and scalability drove the move toward structured methodologies
- Where UVM sits in this timeline and what it standardized
- How to choose the right testbench style for a given project
The Progression at a Glance
The diagram below maps the six generations of testbench design, the core problem each solved, and the limitation that forced the next step.
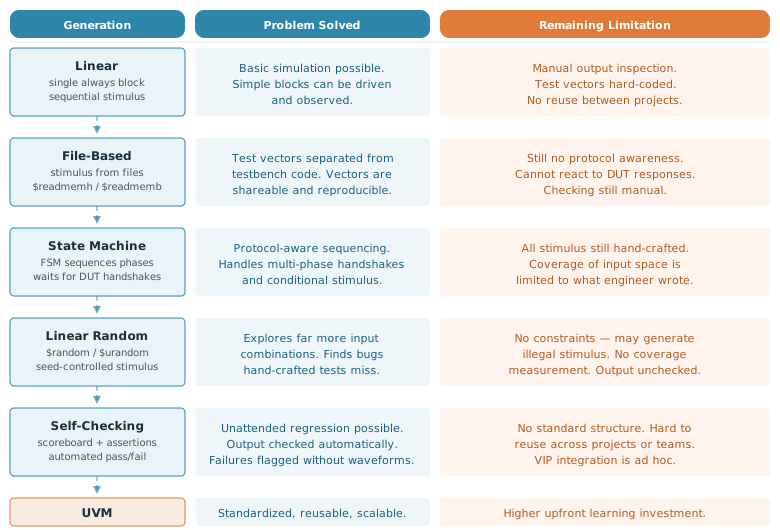
Generation 1 — Linear Testbench
The linear testbench is the simplest possible verification environment: a single Verilog module that instantiates the DUT, generates a clock, applies reset, and drives a fixed sequence of stimulus values one after another. There is no intelligence, no feedback from the DUT, and no automatic output checking — the engineer runs the simulation, opens a waveform viewer, and manually inspects the signals.
Despite its limitations, the linear testbench is still the right choice in specific situations: a quick smoke test to confirm a new module compiles and resets correctly, a tiny combinational block with five input combinations, or a one-off debug session targeting a single known scenario. The overhead of building anything more sophisticated would cost more time than it saves.
The linear testbench's fatal flaw is not that it is simple — simplicity is a virtue. The flaw is that checking is manual. As soon as the number of test scenarios grows beyond what a human can visually inspect in a reasonable time, the linear testbench stops being viable.
Generation 2 — File-Based Testbench
The file-based testbench separates test vectors from testbench code. Stimulus is stored in external files — typically hex or binary format — and read into the simulation using $readmemh or $readmemb. Expected outputs can be written to files and compared offline against a golden reference.
This solved a real problem: test vectors can now be shared between teams, stored in version control, and updated without modifying the testbench code. A hardware engineer can generate vectors from a software model and hand them to the verification team without either side needing to understand the other's code.
What it did not solve: the testbench still cannot react to what the DUT does. Every input is applied in the exact sequence the file specifies, regardless of whether the DUT is ready to receive it. Protocol handshakes — where the testbench must wait for an acknowledgment before sending the next transaction — are impossible to handle correctly in a purely file-driven environment.
Generation 3 — State Machine Testbench
The state machine testbench introduced protocol awareness. Instead of blindly applying stimulus from a script, the testbench uses a finite state machine to sequence through phases — initialize, drive, wait for response, check, done — and transitions between phases based on DUT outputs.
This made it possible to verify interfaces with handshake protocols: the testbench can wait for a ready signal before sending the next transaction, respond correctly to a stall, and sequence through a multi-phase protocol without producing illegal stimulus.
The remaining gap: every scenario the state machine covers was explicitly written by an engineer. The testbench handles the sequences it was coded to handle and nothing else. Discovering the bugs that live outside those sequences requires writing more states — which does not scale.
Generation 4 — Linear Random Testbench
Adding $random or $urandom calls to the stimulus generation was a significant step forward. Instead of a fixed sequence of values, the testbench now generates different inputs on every run, controlled by a seed. Rerunning the same test with a different seed explores a different part of the input space — each run contributes new coverage.
This exposed bugs that hand-crafted tests never would have found, because the random engine generates input combinations the engineer would not have thought to write. It also introduced reproducibility: saving the seed that triggered a failure allows the exact same sequence to be replayed for debug.
The critical gap: there are no constraints on the random values. The generator may produce illegal input combinations that the DUT is never supposed to receive. And because output checking is still manual — or absent — a wrong DUT response may go undetected even when the stimulus was valid.
Quick Check
Q: A random testbench for a bus controller generates a random 32-bit address on every transaction. The DUT only accepts addresses in the range 0x0000_0000 to 0x0FFF_FFFF. What problem does this create, and what is the generation-5 solution?
Show Answer
Without constraints, roughly 94% of generated addresses are outside the valid range — the DUT receives illegal stimulus most of the time, making most simulation cycles useless. The scoreboard also cannot predict correct DUT behavior for illegal inputs, so checking breaks down. The solution from the self-checking generation is constrained randomization: SystemVerilog's rand and constraint mechanism restricts the generated values to the legal range while still exploring it randomly.
Generation 5 — Self-Checking Testbench
The self-checking testbench combined constrained random stimulus with automatic output verification. Two advances made this possible: SystemVerilog's object-oriented features enabled constrained randomization through the rand and constraint keywords, and the scoreboard pattern gave the testbench a way to check every DUT output automatically without human inspection.
With a self-checking testbench, a regression suite becomes viable. Hundreds of tests can run overnight with different seeds, and any failure produces an error message identifying the exact transaction that went wrong — no waveform inspection required. The engineer arrives in the morning to a list of failures, not a stack of waveform files to scroll through.
The problem that emerged at this generation was not technical — it was organizational. Every team built their self-checking testbench differently. A verification IP (VIP) component written for one project could not be dropped into another project without significant rework. An engineer moving between teams had to learn a new testbench architecture for every new project. There was no standard.
Generation 6 — UVM
The Universal Verification Methodology, first released by Accellera in 2011 and later standardized as IEEE 1800.2 in 2017, solved the reusability and portability problem by defining a standard class library and component architecture that all UVM testbenches follow. Every UVM environment has the same structural components — agent, driver, monitor, sequencer, scoreboard, environment, test — connected through standardized TLM interfaces. A UVM VIP written by one team can be integrated into another team's environment with minimal rework.
UVM did not introduce new verification concepts — constrained randomization, scoreboards, functional coverage, and assertions all existed before UVM. What it standardized was the structure of how those concepts are packaged, connected, and reused. This is why UVM adoption spread rapidly across the industry: the learning investment pays off across every project, not just the one it was built for.
UVM is not always the right choice. A small block-level testbench for a 200-line RTL module does not need a full UVM environment. The overhead of building agents, sequencers, and TLM connections would take longer than writing a simple self-checking testbench. UVM's value scales with complexity, team size, and the need to reuse components across multiple projects.
Choosing the Right Style for Your Project
The right testbench style is determined by three factors: the complexity of the DUT, the size of the team, and the expected reuse of the verification components.
| Style | Best For | Not Suitable For |
|---|---|---|
| Linear | Quick smoke tests, tiny combinational blocks | Any block requiring coverage closure |
| File-Based | Sharing vectors with other tools or teams | Protocol interfaces requiring handshake |
| State Machine | Protocol-aware sequencing, known scenario sets | Large input spaces needing randomization |
| Linear Random | Quick exploration of a large input space | Any interface with constraints on legal values |
| Self-Checking | Most block-level verification projects | Projects needing VIP reuse across teams |
| UVM | Complex blocks, SoC integration, shared VIP | Simple blocks where overhead exceeds benefit |
Quick Check
Q: A verification team is building a testbench for a reusable AXI4 memory controller IP that will be integrated into three different SoC projects over the next two years. Which testbench style is most appropriate, and what is the deciding factor?
Show Answer
UVM. The deciding factor is reuse across multiple projects. A UVM environment with a properly structured AXI4 VIP agent can be integrated into each of the three SoC projects with minimal rework — the agent, sequences, and scoreboard are all portable. A custom self-checking testbench would need to be rebuilt or heavily adapted for each integration. The upfront investment in UVM structure pays off across the project portfolio.
Common Mistakes
Mistake #1: Choosing UVM for every project regardless of complexity.
Wrong: Building a full UVM environment with agents, sequencers, and TLM connections for a 150-line synchronous FIFO that has three inputs and one output.
Right: Using a self-checking testbench with a scoreboard and constrained random stimulus — the environment is built in a fraction of the time, covers the design thoroughly, and produces equally reliable results.
Why? UVM's value comes from standardized reusability across teams and projects. For a small, standalone block with no reuse requirement, the infrastructure overhead of UVM costs more engineering time than it saves. Match the testbench complexity to the problem.
Mistake #2: Skipping straight from a linear testbench to UVM without understanding the intermediate steps.
Wrong: A new verification engineer learns UVM from documentation without first writing a self-checking testbench from scratch. They can instantiate UVM components but do not understand what each one is doing or why.
Right: Building at least one self-checking testbench with a hand-written scoreboard before using UVM. Each UVM component — driver, monitor, scoreboard, sequencer — maps directly to a concept that exists in the non-UVM equivalent.
Why? UVM is a framework built on top of the concepts from earlier generations. Engineers who skip the foundations often struggle to debug UVM environments because they cannot identify which layer of the framework is responsible for a failure.
Mistake #3: Treating the testbench generation as a one-time decision made at project start.
Wrong: Starting with a linear testbench for early bring-up and never evolving it as the design matures and more features are added to the verification plan.
Right: Planning the testbench evolution alongside the verification plan — starting with directed tests for early RTL, adding a scoreboard once the DUT interface is stable, and introducing constrained random tests as coverage gaps are identified.
Why? The testbench must grow with the project. A linear testbench that was appropriate for the first RTL drop becomes a liability six months later when it cannot produce coverage data or run unattended regression. Plan the evolution upfront rather than scrambling to retrofit it under schedule pressure.
Practice Exercise
Challenge: Match the Testbench Style to the Scenario
For each scenario below, identify the most appropriate testbench style and give one sentence justifying the choice:
- A two-input AND gate being verified as part of a 30-minute tutorial exercise.
- An AXI4-Lite register interface block that will be reused across five product variants over three years.
- A CRC engine where a software team has already produced 10,000 input/output test vectors in a CSV file.
- A UART transmitter where the verification team wants to find unexpected bugs beyond the scenarios in the Vplan.
- A memory arbiter that must be verified against a protocol spec requiring strict request/grant sequencing.
Show Answers
- AND gate: Linear — the entire input space is four combinations, a linear testbench covers it completely in under ten lines.
- AXI4-Lite block: UVM — reuse across five product variants over three years is exactly the use case UVM solves; a well-structured VIP agent will pay for itself on the second integration.
- CRC engine: File-based — 10,000 pre-computed vectors from a software reference model are the ideal input for a file-based testbench; the checking can compare DUT outputs against the expected outputs column in the same CSV.
- UART transmitter: Self-checking with constrained random — constrained randomization explores baud rates, data values, parity modes, and back-to-back transactions that the Vplan did not explicitly enumerate; the scoreboard catches wrong outputs automatically.
- Memory arbiter: State machine or self-checking — the strict request/grant sequencing requires protocol-aware stimulus that reacts to DUT outputs; a state machine handles the sequencing, and adding a scoreboard makes it self-checking.
Summary
- Testbench design evolved through six generations: linear → file-based → state machine → linear random → self-checking → UVM, each solving the critical limitation of the previous style
- The linear testbench is still appropriate for simple blocks and quick smoke tests — complexity should match the problem
- Self-checking testbenches, combining constrained random stimulus with scoreboards, enable unattended regression and are the right choice for most block-level verification
- UVM standardized the structure of self-checking environments, enabling VIP reuse across teams and projects — its value scales with complexity and reuse requirements
- Choose the testbench style based on DUT complexity, team size, and expected component reuse — not habit or familiarity
