
A testbench that prints values and leaves you to read them does not scale past a handful of transfers. To verify an APB slave properly, the testbench has to decide on its own whether the slave behaved: it needs a reference model that knows what each register should hold, a scoreboard that compares every read against it, and checks that the APB rules are followed. This article builds such a self-checking testbench in plain Verilog and uses it to find a bug in a register block.
9 min read | Intermediate
What You'll Learn
- Build a reference model and scoreboard for an APB register block
- Combine directed and random APB transfers
- Write protocol checks that run on every clock edge
- Map these pieces onto a UVM agent and onto formal properties
The Parts of a Self-Checking Testbench
The design under test (DUT) is the four-register completer from APB Bus Protocol, with registers at 0x0, 0x4, 0x8 and 0xC. Around it the testbench has four parts:
- Stimulus: decides which transfers to run, first a directed sequence and then random ones.
- Requester tasks:
apb_writeandapb_readturn each transfer into APB signal activity. - Reference model and scoreboard: the model records what every register should hold; the scoreboard compares each read with it.
- Protocol checker: watches the APB signals on every clock edge and flags any broken rule.
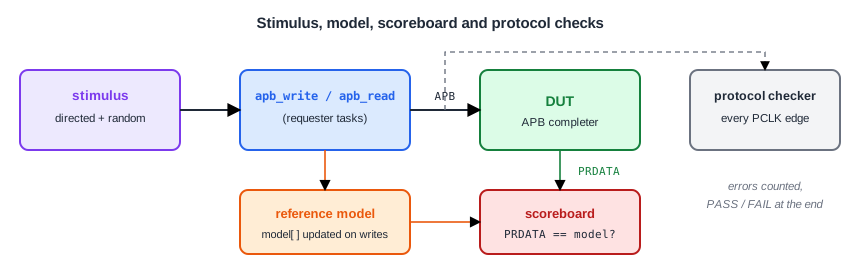
Every check increments one error counter, and the test prints PASS or FAIL at the end. A regression of hundreds of tests then only has to look for that one line.
Reference Model and Scoreboard
For a register block, the reference model is simply an array with one entry per register. The write task updates the model after the transfer completes. The read task compares the data it got with the model:
reg [31:0] model [0:3];                  // what each register should hold

task apb_write(input [11:0] a, input [31:0] d);
  begin
    // ... Setup and Access phases as before ...
    model[a[3:2]] = d;                   // update the reference model
  end
endtask

task apb_read(input [11:0] a, output [31:0] d);
  begin
    // ... Setup and Access phases as before ...
    d = PRDATA;
    reads = reads + 1;
    if (d !== model[a[3:2]]) begin       // scoreboard: compare against the model
      $display("%0t  MISMATCH read 0x%h: got 0x%h, expected 0x%h", $time, a, d, model[a[3:2]]);
      errors = errors + 1;
    end
  end
endtask
The model starts with the reset values, all zero here. The comparison uses !== so that an X on PRDATA counts as a mismatch instead of slipping through. For a richer block such as the timer from Designing an APB Register Block, the model also needs the access types: RO registers keep their value on a write, W1C bits clear on a 1, and the counter has to be predicted or excluded from the comparison.
Quick Check
Q: Why does the model take the register index from address bits 3:2, the same bits the DUT uses?
Show Answer
Because the register map says the registers are at 0x0, 0x4, 0x8 and 0xC, so bits 3:2 select them. The model is written from the specification, not copied from the RTL. If the RTL decodes the wrong bits, the two disagree and the scoreboard catches it.
Directed Then Random Stimulus
A directed sequence checks the basics in a predictable order: write every register with a different value, then read every register back. Random transfers then mix writes and reads to random registers with random data, which finds orderings nobody thought to write by hand:
// Directed: write every register, then read every register back
for (i = 0; i < 4; i = i + 1)
  apb_write(i * 4, 32'hA000_0000 + i);
for (i = 0; i < 4; i = i + 1)
  apb_read(i * 4, rdata);

// Random: 40 transfers to random registers
for (i = 0; i < 40; i = i + 1) begin
  addr  = {$random(seed)} % 4 * 4;
  wdata = $random(seed);
  if ($random(seed) & 1)
    apb_write(addr, wdata);
  else
    apb_read(addr, rdata);
end
The seed variable makes the random sequence repeatable: the same seed gives the same transfers, so a failure can be replayed. A regression runs the same test with many seeds.
Protocol Checks
The scoreboard checks data. Protocol checks look at timing: is every transfer a legal APB transfer? This checker samples the bus on every rising edge and compares it with the previous edge:
reg        prev_sel = 0;
reg        prev_en  = 0;
reg        prev_rdy = 0;
reg [11:0] prev_addr;
reg        prev_wr;

always @(posedge PCLK) begin
  // An Access phase must follow a Setup phase: PENABLE rises only when PSEL was already high
  if (PENABLE && !prev_en && !prev_sel) begin
    $display("%0t  PROTOCOL: PENABLE without a Setup phase", $time);
    errors = errors + 1;
  end
  // PADDR and PWRITE stay stable from Setup until the transfer completes
  if (prev_sel && PSEL && !(prev_en && prev_rdy) && (PADDR != prev_addr || PWRITE != prev_wr)) begin
    $display("%0t  PROTOCOL: PADDR/PWRITE changed during a transfer", $time);
    errors = errors + 1;
  end
  prev_sel  <= PSEL;
  prev_en   <= PENABLE;
  prev_rdy  <= PREADY;
  prev_addr <= PADDR;
  prev_wr   <= PWRITE;
end
Here the requester is the testbench itself, so these checks guard the testbench. That is not wasted effort: a requester task with a bug gives every later result a wrong reference. The same checker, attached to a bus where a real bridge is the requester, checks the bridge. Checks for the completer side follow the same pattern, for example that PREADY rises within a maximum number of cycles.
Finding the Bug
The DUT in this example has a bug. Its address decode is one line:
wire [1:0] idx = PADDR[2:1]; // BUG: the word index is bits 3:2
The testbench reports it straight away:
165  MISMATCH read 0x000: got 0xa0000002, expected 0xa0000000
195  MISMATCH read 0x004: got 0xa0000003, expected 0xa0000001
285  MISMATCH read 0x000: got 0xa0000002, expected 0xa0000000
645  MISMATCH read 0x00c: got 0x0badab17, expected 0x23886547
...
FAIL: 11 errors in 24 reads
The first two lines already point at the cause. With bits 2:1, address 0x8 decodes to register 0, the same as 0x0, and 0xC decodes to register 2, the same as 0x4. The directed writes to 0x8 and 0xC overwrote the values written to 0x0 and 0x4. With the decode fixed to bits 3:2, the same test prints:
PASS: 24 reads checked, no errors
Quick Check
Q: Would a test that writes one register and reads it back have found this bug?
Show Answer
No. Each register on its own reads back what was written. The bug only shows when two addresses that alias are both written before a read, which the directed write-all, read-all sequence does on purpose.
From Here to UVM and Formal
Every part of this testbench has a direct counterpart in a UVM environment. The requester tasks become the driver, the transfers become sequence items, the protocol checker moves into the monitor or into assertions in the interface, and the model and scoreboard become a register model and a scoreboard component. The UVM APB Agent article builds that agent. For larger register maps, the UVM register model generates the reference model from the register description.
The protocol rules can also be proven instead of simulated. A formal tool explores every possible sequence of inputs, so a property like "the slave answers within N cycles" is checked for all transfers at once. The Simple Bus Slave article in the formal verification tutorial does this for a small bus slave.
Running It in ChipVerify Lab
The example contains the buggy completer and the self-checking testbench. Run it and read the first mismatches to find the bug.
Common Mistakes
Mistake #1: Copying the RTL into the model
A model written by copying the DUT's code has the same bugs as the DUT, and the scoreboard always agrees. Write the model from the register map.
Mistake #2: Comparing with == instead of ===
If PRDATA is X, d != model is X, which an if treats as false: the mismatch is silently skipped. Use !== so that X counts as a mismatch.
Mistake #3: Random tests without a fixed seed
A failure you cannot reproduce is very hard to debug. Print the seed at the start of each test and make it settable, so any failing run can be replayed exactly.
Practice Exercise
Challenge: Fix the Slave, Then Break the Requester
Fix the address decode and confirm the test passes. Then put a bug into the requester instead: in apb_write, change PADDR at the start of the Access phase. Which checks fire?
Hint
Add PADDR <= a ^ 12'h004; right after PENABLE <= 1; in the write task.
Solution
wire [1:0] idx = PADDR[3:2]; // fixed decode
With the fix the test prints PASS: 24 reads checked, no errors. With the requester bug, the protocol checker fires at the end of every write, and the scoreboard reports mismatches too, because each write landed in the neighbouring register:
45  PROTOCOL: PADDR/PWRITE changed during a transfer
75  PROTOCOL: PADDR/PWRITE changed during a transfer
105  PROTOCOL: PADDR/PWRITE changed during a transfer
135  PROTOCOL: PADDR/PWRITE changed during a transfer
165  MISMATCH read 0x000: got 0xa0000001, expected 0xa0000000
...
The protocol message names the real cause; the mismatches only show its effect. That is why protocol checks are worth having even when a scoreboard exists.
Open the ready-made example in the lab and run the simulation.
Summary
- A self-checking testbench decides PASS or FAIL on its own from a model, a scoreboard and protocol checks.
- For a register block, the reference model is an array updated on writes and compared on reads, written from the register map.
- Directed transfers check the basics; seeded random transfers find unexpected orderings and stay reproducible.
- Protocol checks run on every clock edge and point at the cause of a failure rather than its effect.
- The same structure maps onto a UVM agent and scoreboard, and the protocol rules onto formal properties.
